
You found my den, I apologize in advance lol 30 He/Him (but kinda liking He/They)Please be patient, I’m on the autism spectrum.
51 posts
Brunchrodent - BrunchRodent’s Den

-
 jenna12381 liked this · 1 year ago
 -
 nervousinternetobject liked this · 1 year ago
 -
 lil-cute-shinigami-comic liked this · 1 year ago
 -
 thelindenpapers liked this · 1 year ago
 -
 eastvillagetours reblogged this · 1 year ago
 -
eastvillagetours liked this · 1 year ago
-
 despiteof1974 liked this · 1 year ago
 -
 nando161mando liked this · 1 year ago
 -
 hiphopkleftis liked this · 1 year ago
 -
 anarchist-revolution reblogged this · 1 year ago
 -
anarchist-revolution liked this · 1 year ago
-
 conjuntoempty liked this · 1 year ago
 -
 brunchrodent reblogged this · 1 year ago
 -
brunchrodent liked this · 1 year ago
-
 icelandsgirl liked this · 1 year ago
More Posts from Brunchrodent
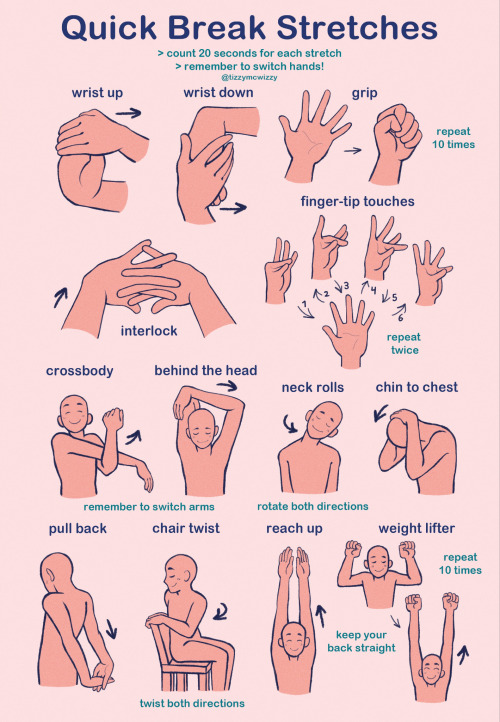
this is a poster i made for my call to action assignment in humanities! it's a bunch of basic and easy stretches for people who sit and work at a desk all day (me)
the idea is that you'd put the poster up above ur desk and do the stretches every 30 minutes or so,, the whole routine won't take more than about 6 minutes to complete and when done regularly it can prevent wrist, shoulder, neck and back pain! :)
all these stretches can be done while sitting (although i HIGHLY recommend you stand up and move around while taking a break from working)
you can get a free digital copy of this poster here on my gumroad!
Happy Pride to y’all! And to every young person who is experiencing their first instance of “oh fuck I might be queer” and may be panicking over it, I’m gonna say this: don’t fret over it! You have plenty of time to figure things out! Hell, I’m in my 30’s and I’m still figuring out the finer details of my identity (just this year, I learned that while I’m cool with he/him pronouns, I’m REALLY digging He/They).
So, in short don’t worry! Take your time, and enjoy what you enjoy. And if you wanna put a label on it, then go for it!
Remember, Life is a lesson, and you learn it when you’re through.
Shoutout to leftists who are too poor/disabled to give back to their community.
Shoutout to leftists who are too poor/disabled to shop at local/small businesses.
Shoutout to leftists who are poor/disabled and have to buy things from Amazon and other megacorps because it’s the most cheap or convenient.
Shoutout to leftists who are too poor/disabled to reduce their environmental footprint because they need the single-use plastics.
Shoutout to leftists who can’t go vegan because of dietary needs, disordered eating, or neurodivergence.
Shoutout to leftists who can’t volunteer or go to community events/protests/noise demonstrations because of inaccessibility.
Shoutout to leftists who can only be politically active online because they’re housebound.
Shoutout to leftists who are disabled and are rarely politically active because they simply don’t have the energy.
Shoutout to leftists who can’t be politically active because they’re under the care of a guardian or are trapped in an abusive situation, and they don’t have control over their finances/belongings.
Shoutout to leftists who can’t read theory, or who have trouble reading theory, but still do their best to learn.
Shoutout to leftists who can’t understand theory at all because of cognitive/intellectual disability.
Shoutout to leftists who want to be more active in their community but can’t because they struggle with anxiety, socializing, or maintaining relationships.
Shoutout to leftists with personality disorders, complex trauma disorders, conduct disorders, OCD, psychosis, and any other leftist whose personality or thoughts often unwillingly go against their beliefs due to a trauma response or chemical imbalance.
Shoutout to leftists who don’t have any “practical” skills that would be needed in a commune (i.e farming, building, sewing)
Shoutout to leftists who are too busy simply trying to survive to even think about being politically active.
Shoutout to leftists who have to always ask for mutual aid but can never give back.
Shoutout to all the leftists who can’t do this and can’t do that and can’t do the things that leftists are “supposed” to do. No one person is perfect.
You aren’t a fake leftist for not being able to do these things. All that matters is that you put in the effort, in whatever way that you can.
It’s not about your abilities as an individual. It’s about our power as a collective.
Hey all, you know how internet searches suck now? When the results are awful, full-of-AI, death-of-the-internet levels of bad?
Start appending date constraints to your searches - "before:2023".
My results have gone from 90% AI bullshit to ~60% usable - which frankly at this point is a huge improvement.
Had a few folks interested in how I made the patches I posted for Solarpunk Aesthetic Week, so I thought I'd give y'all my step-by-step process for making hand-embroidered patches!

First, choose your fabric and draw on your design. You can use basically any fabric for this - for this project I'm using some felt I've had lying around in my stash for ages.

Next, choose your embroidery floss. For my patches I split my embroidery floss into two threads with 3 strands each, as pictured. You can use as many strands in your thread as you prefer, but for the main body of my patches I prefer 3 strands.
Next you're going to start filling your design using a back stitch.

First, put in a single stitch where you want your row to start.

Poke your needle up through the fabric 1 stitch-length away from your first stitch.

Poke your needle back down the same hole your last stitch went into so they line up end-to-end.
Repeat until you have a row of your desired length (usually the length of that colour section from one end to the other). Once you have your first row, you're going to do your next row slightly offset from your first row so that your stitches lay together in a brick pattern like this:

Make sure your rows of stitches are tight together, or you'll get gaps where the fabric shows through.
Rinse and repeat with rows of back stitch to fill in your patch design.

When you're almost to the end of your thread, poke your needle through to the back of the fabric and pull the thread under the back part of the stitching to tuck in the end. Don't worry if it looks messy - no one's gonna see the back anyway.
This next step is fully optional, but I think it makes the patch design really pop. Once your patch is filled in, you can use black embroidery floss to outline your design (or whatever colour you want to outline with - it's your patch, do what you want). I use the full thread (6 strands, not split) of embroidery floss to make a thicker outline.

I use the same back stitch I used to fill the piece to make an outline that adds some separation and detail. You could use most any 'outlining' stitch for this, but I just use back stitch because it's just easier for me to do.
Once you're finished embroidering your patch, it's time to cut it out!

Make sure to leave a little border around the edge to use for sewing your patch on your jacket/bag/blanket/whatever, and be careful not to accidentally cut through the stitches on the back of the patch.
If you have a sturdy enough fabric that isn't going to fray, you can just leave it like this. If not, I recommend using a whip stitch/satin stitch to seal in the exposed edges (I find that splitting your embroidery floss into 3-strand threads works best for this).

And then you're done! At this point you can put on iron-on backing if you want, or just sew it on whatever you wanna put it on. Making patches this way does take a long time, but I feel that the results are worth it.
Thanks for reading this tutorial! I hope it was helpful. If anyone makes patches using this method, I'd love to see them! 😁