Photoshop Psd - Tumblr Posts

» Flowerland.psd
effect made by @gmfioart ©
— please, like or reblog if you download; por favor, dê like ou reblogue se fizer download. — don't repost or claim as yours; don't copy! não reposte ou divulgue como seu. não copie! — for commercial use, please, contact us or buy from deviantart. para uso comercial, nos chame na ask por gentileza ou compre pelo deviantart.
↷ Download here: Deviantart. !! feedback us! tell us if you like it or if you're having a problem. !! nos dê seu feedback! nos diga se você está satisfeito ou se está tendo problemas com o efeito.

» Sinners.psd
effect made by @gmfioart ©
— please, like or reblog if you download; por favor, dê like ou reblogue se fizer download.
— don't repost or claim as yours; don't copy! não reposte ou divulgue como seu. não copie!
— for commercial use, please, contact us or buy from deviantart. para uso comercial, nos chame na ask por gentileza ou compre pelo deviantart.
↷ Download here: Deviantart.
!! feedback us! tell us if you like it or if you're having a problem.
!! nos dê seu feedback! nos diga se você está satisfeito ou se está tendo problemas com o efeito.

» Prince.psd
effect made by @gmfioart ©
— please, like or reblog if you download; por favor, dê like ou reblogue se fizer download.
— don't repost or claim as yours; don't copy! não reposte ou divulgue como seu. não copie!
— for commercial use, please, contact us or buy from deviantart. para uso comercial, nos chame na ask por gentileza ou compre pelo deviantart.
↷ Download here: Deviantart.
!! feedback us! tell us if you like it or if you're having a problem. !! nos dê seu feedback! nos diga se você está satisfeito ou se está tendo problemas com o efeito.

» Kaleydo.psd
effect made by @gmfioart ©
— please, like or reblog if you download; por favor, dê like ou reblogue se fizer download.
— don't repost or claim as yours; don't copy! não reposte ou divulgue como seu. não copie!
— for commercial use, please, contact us or buy from deviantart. para uso comercial, nos chame na ask por gentileza ou compre pelo deviantart.
↷ Download here: Deviantart.
!! feedback us! tell us if you like it or if you're having a problem. !! nos dê seu feedback! nos diga se você está satisfeito ou se está tendo problemas com o efeito.


» SUN-MELTIN’.psd
effect made by @gmfioart ©
— please, like or reblog if you download; por favor, dê like ou reblogue se fizer download. — don't repost or claim as yours; don't copy! não reposte ou divulgue como seu. não copie! — for commercial use, please, contact us or buy from deviantart. para uso comercial, nos chame na ask por gentileza ou compre pelo deviantart.
↷ Download here: Deviantart.
!! feedback us! tell us if you like it or if you're having a problem. !! nos dê seu feedback! nos diga se você está satisfeito ou se está tendo problemas com o efeito.
COLOR TUTORIAL #1
Color Porn Lydia.
Another tutorial, this time with a lot of contrasting and color, featuring a Crying Banshee. This will be part one of a two or three part theme I’m trying to establish. Mostly working with color porn and contrasting.
I am using Photoshop CS5, and this is not a beginner tutorial, but it isn’t too hard either.
I will be showing you how to turn this:

into this:

First start with a duplication of the background layer, then resize and crop how you want. My cap is 500x280. Next add a black and white gradient map and set the blend mode to soft light. Duplicate the layer and set the opacity to 45%. Now some lighting. Levels, curves and levels again; these are the settings I used.


Then a gradient map,

black, #000000; pink, #f10055. Set it to darken and make a layer mask to color the background. The mask will end up looking like this.


After that layer you want to hold CTRL and click into the black and white box for the curves layer, so that it selects only the parts of the face you highlighted with curves. Then make a levels adjustment.

Next you want to make a new layer, empty and select a small round brush, soft. Then a nice pink color, close to the color that you used for the background, so we can color the lips. I used this color #e40559. Then change the blend mode to multiply and change the opacity to 34%.
This screenshot has a lot of tight subtle emotion and fear, and I did want to focus on that, so I made another curves layer; output 140, input 114 and then mask it so the layer is hidden. Use a white brush to paint over the tear and some on her eyelids. Erase and blend as needed. Here is my finished mask.

Then another curves for her eyes. This one should be output, 106; input, 135. Then mask and use a soft round brush again. This was my end mask.

This is where the cap should be right now.

More curves. This time we mask it for the irises; the first curves should be output, 142; input, 100.


That’s the eyes right now. Next I added a simple selective color, just focusing on black (+5).
Take a soft brush, black; and make a new layer. Color only the left side of the cap, like so:

Gradient fill next, just to add to the shading on the left:

Now another solid color, pink same color as the background. Mask it and use a soft brush to blend it over the background and onto some of Lydia’s hair. The blend mode is color and the opacity 25%.

Add a selective color again, +5 black. Then another, for red adjustments.


Next is a vibrance layer, masked for the face.

Vibrance +28, saturation +14.
Next a gradient fill, now this one will focus on adding even more color to the right hand side. #000000, #e09696.

And focus it on the right, this was my mask.

Blend mode hard light, 38% opacity.

This should be masked for only the hair. Just to adjust and bring Lydia’s gorgeous strawberry blonde hair out of the pink background. Next another magenta selective color.

This is how it looks so far.

I added two textures, very subtle and sharpened after. Texture 1, set that to lighten and 24% opacity. Texture 2, this one I did screen at 16% opacity. Lastly, you press CTRL, ALT, SHIFT+E to stamp the image. Which just means you create a layer on top of everything that blends all the layers but also keeps the originals. Then filter>sharpen>smart sharpen; amount 500, radius 0.3, more accurate and remove gaussian blur.

Here’s a second example of another screencap using pretty much the same methods:

DOWNLOAD THE PSD HERE.
COLOR TUTORIAL #3
Yet another tutorial, this time with orange, yellow, contrasting and Sam and Dean. Beginner to Intermediate level skills. I use Photoshop CS6 for all of my tutorials.
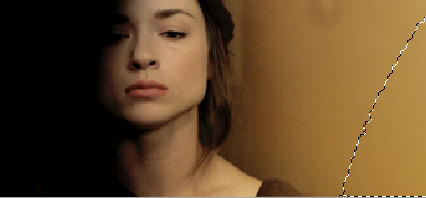
To be clear, I will show you how to turn this unedited screencap of Sam Winchester:

Into this:

First things first, open up the top screencap and crop as needed. My cap was cropped on the top and bottom edges, and resized it to 500 x 264. Then I duplicated the background layer, set it to screen and duplicate it again. Adjust the opacity of the second duplication as you need to.
Like most of my tutorials I use gradient layers to increase light and shadows. Right click on the two below to save them.


The top one needs to be set to soft light, and placed wherever the greatest shadows are in your image. For this cap, the dark in on the left, the light on the right. Duplicate that layer, then add the bottom gradient set to soft light again, opacity should be 75-80%.
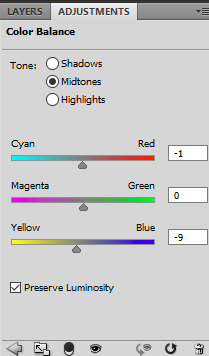
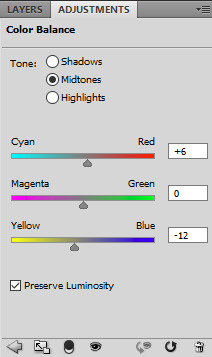
Next a black and white adjustment set to soft light, I put the opacity to about 12%. Next color balance.

(color balance: +22, +5, -33; I didn’t change the shadows or highlights)
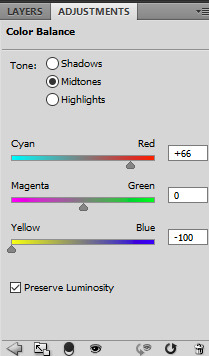
Then another color balance.

(color balance: +38, -9, +37; I didn’t change the shadows or highlights)
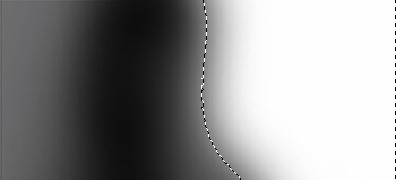
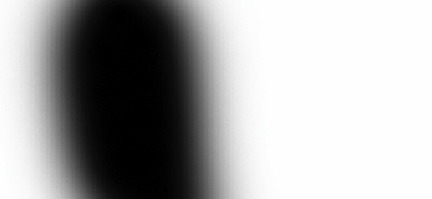
Mask this color balance layer and focus it on the background. My end mask was like this:

Now we add some color. Make a new blank layer and take a large soft brush in an orange tone (#f5c665) Set it to hard light, 38-40% opacity. Then color on the right side, away from Sam.

Another color balance layer. This time: midtones -10, 0, +15; highlights +23, +17, +31; shadows +29, 0, +36.

Mask that color balance like the layer above. We only want these tones on the right side. Add another one, this one will be for the entire image. Midtones 0, 0, 0; highlights 0, 0, -3; shadows +3, 0, -3. Next make a selective color adjustment, only focusing on black tones (+20).
Then another blank layer, and this time just use black to fill in the left hand side. Use a soft brush; like so:

Next two solid color fill layers. The first in this color #ec9d75, 44% opacity. The second in this color #e07761, 60% opacity. These are the masks:

Another selective color; reds, -10, +8 and blacks 0,0,0, +8. Now add a black & white gradient, soft light blend mode and 44% opacity.This is how he looks so far:

Next I did a lot of coloring to the eyes. Curves, color balance and a layer of black fro the pupil. Then I used a light pink color set to multiply and colored over his lips at a low opacity. Subtle changes in detail can make all the difference in my opinion, but these two steps are optional.

(color balance: midtones +6, 0, -13; highlights +6, 0, +20; shadows 0, 0, 0)
Then a vibrance adjustment, +19, +5. Yet another color balance: midtones -8,0,-12; highlights 0,0,+20; shadows 0,0,0.

(selective color: reds +12,-4,-7,0)
Now stamp the image (ctrl+shift+alt+e) and smart sharpen. These are the settings I always use.

Last, I added one more color balance and masked it like so:

(color balance: midtones -13,0,-24; highlights 0,0,-15; shadows 0,0,0)
Finished result:

Here is a second image, this time of Dean with the same method:

DOWNLOAD THE PSD HERE.
COLORFUL GIF TUTORIAL
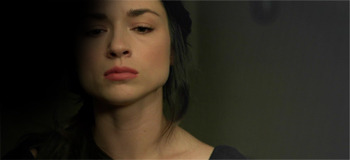
Another tutorial! This time I’m showing people how I make colorful gifs, like the ones in my latest giset of Allison Argent from Teen Wolf. The tutorial is for doing it with gifs, but of course you can also use this as a ref for screencaps too.
Just to remind you all I do not do beginner tutorials, so you have to have some knowledge of Photoshop before you try this. And this, refers to turning this gif:
Into this:
First off, you’ll need a gif to use. I’d suggest just starting with the one I am using since that’s the best starting point. If you want to make your own and don’t know how, try this tutorial or this one.
Now we edit. First thing I do is make a group called PSD and for this gif I made a few blank layers and colored black on the left side of the picture to erase the window in the background.
Next a Gradient Fill to add some light on the right side. My ending mask:

Subtle, but important.
Next add a black and white Gradient Map over the top at 35% opacity, set the blend mode to soft light.
Then a Levels adjustment layer, with these settings:
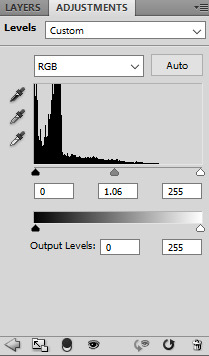
(0,1.06,255 - 0,255)


Download all of those, or just make the gradients yourself. When you add them to the gif make sure to set the blend mode to soft light.
Now make a new blank layer, pick the color you want (I used #c09f5e), and color lightly with a soft round brush on the right side. Here’s my selection:

Make sure to drown the opacity (60-75%) and set the blend mode to soft light.
Now either use hue/sat or just a b&w adjustment layer with 12% opacity and soft light blend mode. And add a Color Balance adjustment after that. I only subtly changed the midtones for this one.
This is how it should look so far:
Now enjoy a gif of adjustments:

blacks, 0,0,0,+11 - yellows, -27,+10,-8,0 - vibrance +9, saturation +6 - yellows, -16,-6,+12,0 - blacks, 0,0,0,+17 - reds,+3,0,0,0 - yellows, +5,+7,-31,0
Using this color #cdab64, with a new black layer, paint over some of the image. Lightly near the bottom of Allison’s chest and shoulders. Stay away from the black areas on the left, and make it light! Here is the end result, selection and mask.
This is meant to add more vibrant color to the right side.
Move on to more color balance, masked and colored like this:
Then I added some Curves, Brightness/Contrast and another Selective Color.
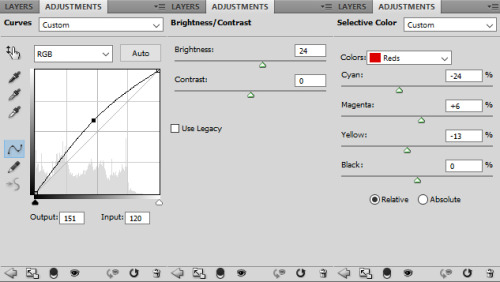
curves, 151,120 - brightness/contrast, 24,0 - reds, -24,+6,-13,0
I also noticed that third black layer from the top of the tutorial was too much black on Allison’s face, so I removed it.
Here’s FINAL GIF!

back and forth preview ↓↓
(I should mention that I added some more shading on the left, specifically around her skull near where the window is, and the difference it subtle, but really great)
And that’s it!
As always, here is the PSD, and another few examples of other colors.