Plywood - Tumblr Posts

Playroom - Kids Room Kids' room - small modern gender-neutral kids' room idea

Deck - Side Yard Deck - large contemporary side yard deck idea with a roof extension

Beach Style Bathroom - Kids Example of a mid-sized beach style kids' white tile and porcelain tile ceramic tile, multicolored floor and double-sink bathroom design with a one-piece toilet, white walls, white countertops, flat-panel cabinets, light wood cabinets, an undermount sink, quartz countertops and a built-in vanity

Great Room (Austin)

Family Room Game Room Large, elegant game room with a door image


This is what I made for myself this Halloween. A dragon lower-half-mask. With a moving jaw. What do I call this sort of thing? Jaw mask? Snout? I'm not really sure. But it turned out pretty awesome, I thought.
I've already had a couple people say they wanted to commission one, so once I tweak and polish the design a bit I'll definitely be making more of these.
Oh, and I'm also wearing some dragon horns that I made around a year ago. I made them by taking a computerized 3D model of the shape I wanted, slicing it into layers, cutting those out of birch plywood with the laser cutter, and then gluing them together. Basically it's like 3D printing but with plywood.


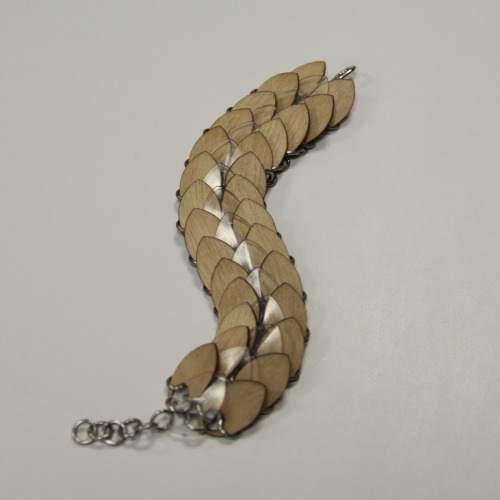
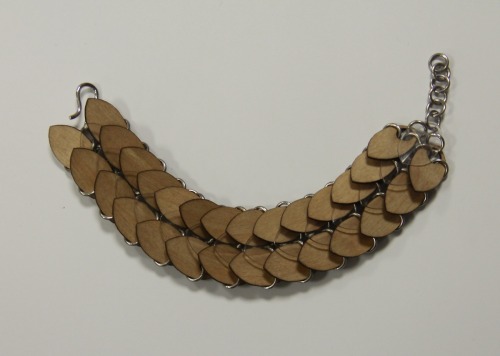
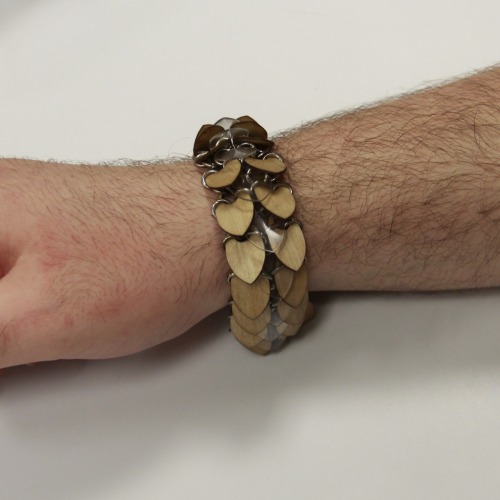
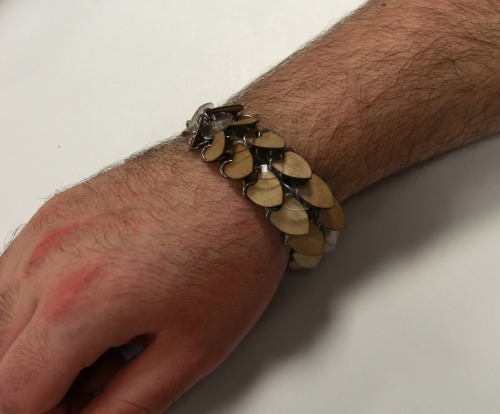
Wooden scale maille bracelet I just made. I've been meaning to do this for years, but the arrival of the clear plastic scales finally goaded me into CADing up the dimensions and laser cutting the wood.
This wood is .8 mm thick plywood, so it's actually a good deal stronger than you'd expect. This first batch of scales I just cut quickly out of a scrap piece the laser shop had lying around. The next time I do it I'll be finishing the wood before I cut it, probably using tung oil. It'll deepen the color a bit, draw out the grain, make it a bit more lustrous, and help it avoid getting dirty.
I'm seriously contemplating making something big like a shirt out of wooden scales, and doing stuff like varying the size and shape of the scales along the piece to give it different textures. I may also look into getting veneers of fancy woods to laminate onto the wood before I cut it. (I need plywood because I don't trust planks of hardwoods not to split in the direction of the grain.)
Oh, and you can follow the link at the beginning to find this on my Etsy store!
Here's a combination of wood and clear plastic scales. This particular one I think didn't work out super well. The first shot shows the plastic scales with nice reflections, which makes them look nice, but when you don't have the reflections it kind of looks like just two disconnected lines of wooden scales.
Also, I suspect nobody else would, but I can tell in this one that I slightly missed the right sizing of the holes for the wooden scales. They're a little too big I think, and the inner rings bump up against each other a bit where they link through the clear scales. Though if the holes are too big, that's confusing, because it seems to require a couple more wooden than normal scales to cover the same distance. So if the holes are too big, that seems backwards. Oh well, I'll make some variants with slightly different sizes and I'll figure it out.
This one I'm not putting up for sale right away actually (since I didn't think it worked very well). So instead this is the one that I'll be wearing around for a while and seeing how much abuse I can put it through before it breaks. So far it's holding up pretty well to blunt impacts and to forceful pulls.


Wooden scale maille choker necklaces that I made in the last week or so after having made some bracelets with smaller wooden scales.
I laser-cut the scales out of marine plywood, which tends to be a very nice material, and is rather strong. (If these were made out of straight planks of hardwood, they would break immediately along the direction of the grain. But the plywood is made with 3 layers of veneer laid cross-wise, so it's much stronger.)
Baltic birch plywood is one of my go-to materials for wood. It's the lighter blonde wood with a very clear grain. I also got a small amount of Okoume to play around with. It's a medium-dark wood with a red tone and a more pronounced grain, a bit similar to mahogany. I like it. For both, I finished the wood with tung oil before cutting it. I'm liking the oil finish more than a varnish or something. It brings out the grain, gives it a bit of luster, and helps waterproof it a bit. But I think it feels more natural and pure than varnishing it, which feels more artificial to me.
I really want to make something large with these scales. Like a dragon tail or a shirt. Also, if people show interest in these, I may also see about acquiring more types of woods.

This project is the reason I kind of dropped off the internet for a couple months there. But isn't it beautiful?
It's a chandelier I was commissioned to design and build for a big fancy fundraising gala. It's being installed in two days.
I'll make a longer more in-depth post with in-progress shots and explanations later, but for now:
laser cut
1/16" thick okoume plywood
bolted together
1/8" birch plywood internal frame
14 light bulbs inside
about 50 lbs
about 50 inches in diameter
currently taking up most of my living room
f***ing awesome.

Small version of the huge pangolin chandelier is looking super good. I'm super excited.
This is actually the second version I cut of this so far, with an updated and much improved internal support structure. I'll talk about it more in-depth when I continue writing out the chandelier saga, but right now I just have to share this.
Chandelier Saga Part 2: CAD
Picking up the story of making this giant lamp, we get to the hardest, most important part, but also the least photogenic. That would be, the computer modeling and prototyping.
Here's what I was going for in terms of structure:

The scales are made of 1/16" thick plywood, linked to their neighbors by bolts. The struts spanning the widths of the scales are there to pull the ends together and make sure the centers bend upwards to let enough light through.
It turned out to take something like 4 full rebuilds of the computer model before I was happy with it. The root of the problem is related to the fact that it's really hard to model how real-life materials will bend. So every few days for a couple weeks I had to re-draw all the geometry with slight differences, head in to the laser shop to cut the pieces out, and assemble them to see what it would look like.
Hit the jump for a bunch of screen shots of the different steps involved in designing the final piece.
Working in Rhino (my 3D Computer Aided Design software of choice/training/convenience), I started with an ideal originator surface, created by revolving a curve. I dropped grid points along it:

Then I drew out the base shape for the scales with points and lines. The tips of the scales are drawn out in space perpendicular to the grid point they're above. Their distance from the surface is proportional to the width of that scale:

Next, turning that into surfaces and mirroring the scales along their center-line. (Also, there were some steps involved in expanding the edges of the scales to accommodate the bolts.)

Next comes a polar array to get them all in place:

And a cut-away view to show the internal structure that would hold the light bulbs in place:

But then (after testing the floppiness of the previous prototype) I decided I should give it a bit more structure to support certain points of the surface. Figuring out the geometry for that was a pain:

With that done, time to flatten the scales:

...and lay out the sheets that I would be laser-cutting:

Then I just have to cut twelve copies of each of these sheets, plus a half dozen or so more sheets for the internal structure.
And that mostly wraps it up for the CAD part of this story. I'm intentionally glossing over a lot of the geometry headaches, because you don't want to think about it. Trust me.
Next up will be photos of construction! Though I foolishly forgot to take any photos of actually laser-cutting the scales.
I'll leave you with the front view of that prototype I showed at the beginning:


Chandelier Saga Part 3: Assembly
And here's the exciting part--putting everything together!
We have:
Pieces being cut on the laser cutter
Treating all the wood with flame-retardant
Sorting all the pieces back out (I etched a label on every piece so this would be feasible.)
Beginning to construct the skin, expanding radially from the bottom center
Assembling the parts for the support structure, along with getting the bulb sockets in place.
Attaching the substructure into the skin
Testing it out (and replacing the bulb that released the magic smoke)
Moving it upstairs and finishing construction in the living room
Just barely fitting it into the car.
And that was it! I was done! It would be hung by rigging professionals, and it would be beautiful! Photos of it installed will be coming in another post.


Chandelier Saga Part 4: The Big Day
Seeing this installed and lit up was fantastic. It was hung in a big tent for a fundraising gala banquet, and it really held its own in the big space. I don't know who it was who had the idea to scatter the smaller paper lamps around the chandelier, but it was a fantastic idea.
I went in before the event started to take photos, and they had lit it up beautifully with color-shifting spot lights. The effect was really cool. By the time the banquet started, though, they'd toned that down to let it illuminate itself. I did very much enjoy seeing the play of colored shadows across the textured surface, but seeing the light seeping from below the scales, making it glow from within as I'd hoped it would, made all that work worth it.
Everyone seemed to love it, which was awesome. The Possible Project, who had commissioned the design, made a couple of these available on their Kickstarter, and two people ordered one. So there will be a couple more of these made!


Chandelier Saga Part 5: Electric Boogaloo
And I thought I might be done. The big chandelier was finished and hung and beautiful, but I still had more work to do. The organization I designed the chandelier for was launching a kickstarter to raise money for the maker space they were going to build, and they really wanted a small version of the lamp to make available as a backer reward.
Though I was able to reuse most of the 3D modeling techniques I worked out for the big one, this one basically had to be redesigned from the ground up. I adjusted the shape to be more compact, and to look better from the side. The structure of the big one relied on the wood bending a certain amount so the scales could be bolted to each other, but that wouldn't work on a this small a piece, so instead it has a central structure with radial ribs that the scales get hung on.
This was the first iteration for the small size. It looked good, but there were two major things I was unhappy with. The big issue had to do with the attachment of the scales to the ribs. Each scale had a single slot along the center-line that fit onto a tab/hook on the ribs. This setup means that all the scales can rotate a little bit along their center-line, so they kind of rustle and jostle in a breeze. Basically, it doesn't feel super solid. I would need to adjust the attachment in some way. The simpler issue was that the scales weren't letting as much light through from below them as I would like, so I would need to angle them outwards more.


Finally got in to use the CNC router! I cut some fancy shelves to put on my desk and hold my stuff! They’re made out of 1/4″ birch plywood. This was basically my test piece for making furniture on the router, so now that I’ve got it partially worked out you may see more of this from me!
Oh, since I haven’t posted this tool to the internet before, here’s the brief rundown three different ways:
• It’s like a laser cutter but huge, and with a router instead of light.
• It’s a computer-controlled cutting machine for large sheet goods like plywood, particle board, acrylic etc. It traces lines like a plotter. Since it’s hard to make a simple saw cut curves in arbitrary materials, it uses a high-speed router bit (like a drill, but set up to push sideways through the material) to eat through the material.
• Plywood goes in, furniture comes out.
I originally put together the design for these shelves over a year ago, but then Everything Kept Happening All The Time and I didn’t manage to make it in to actually use the router for a long time.
Also, wow it’s cheap to use this router. I went to an artists’ shared work space near me called Artisans’ Asylum to do this. It’s like $25 to get in for the day, then it’s only $20 per hour of cutting time. This only took 25 minutes. (Their laser cutter, when it’s working, is $1 per minute of cutting. Compare that to $3 per minute at the place I used to work at, which is now out of business.) (Of course there’s the cost of the training on this machine to factor in, but it was almost a year ago so it doesn’t feel too immediate.)

Oooh man, I finally assembled two (TWO!) items of furniture I designed! The shelves I cut this last Monday. The lamp pieces have been sitting in a box since before Christmas.
I took progress photos of the assembly of both of these, and I’ll post them with an in-depth write-up later. But for now, enjoy this final photo!
One point for everything you can identify on the shelves.

This weekend I wore this around at Anthro New England for a while, and got a whole lot of people asking to take photos of me. But I neglected to get any photos for myself except for this selfie.
I rocked out for hours in this hood, the tail that goes with it, and an assortment of other stuff I'd made. I guess it's broken in now.
I definitely have a list of improvements to make for the next iteration, too.


Leather dragon costume! Matching set of head and tail! I’m very excited, this project was many months in the making.
Aesthetically I was aiming for something sort of halfway in between a fursuit and kink gear. I think the black leather and rivets pull the image pretty strongly towards the latter, giving it a sleek and somewhat sinister vibe.
It’s a hollow shell, not built on a resin or foam base. The leather used is a somewhat firm but flexible chrome re-tanned one, with a very clean semi-glossy finish.
The head has enough space to be worn over glasses! You can see mine in some of the photos. The eyes are clear acrylic, giving a pretty good unobstructed field of vision. The horns are birch plywood laminated together into a solid form. The head opens in the back and laces closed with nylon paracord. The tail is stuffed with poly-fill, and held on with a pair of belt loops.
I designed everything in 3D in Rhino. Because the pieces were pretty big I actually hand-cut all the leather pieces rather than laser-cutting them as I often do. (The plywood for the horns was laser-cut.) You can see some of that process here.
And of utmost importance, this is up for sale! Here’s the Etsy link! If it sells I’ll get to make a new one and try out more new ideas!