Ts4 Resources - Tumblr Posts

After releasing my first collection of UI-ish templates and widgets, I found myself making more during the process of editing my posts. I'd planned on keeping this one around the same size as the previous one, but the longer it took me to properly label and organize my layers, the more I added to the file. So now we're here at like 40-ish templates (and a few even have a hidden version).

[CLICK FOR BIGGER!]
Like my previous collection, I designed this to be a "workspace" or "canvas" from which you can just pull whatever template you need. Each template is labeled and organized into folders so you'll know exactly which layers you need for your screenshot.
Tips on how to use these can be found in the original post as well as this google doc tutorial .
Font used is Helvetihand TS4 icons - L'Universims, TheSimKid, deathbypufferfish, w-sims, Tutorial on how to extract icons
TOU: Feel free to use and edit as you wish but please don't reupload and claim as your own. If someone asks where they're from, please link to this post.
DOWNLOAD FOLDER (SFS)
Windslar Collection 2.0 (91.5mb) If you prefer a less overwhelming version, I also divided this file into two parts. You can find it (as well as the first PSD collection) in the download folder.


insp. by @astystole my beloved
these days i can’t shake this awful feeling i’m missing something i can’t place, is it you?
Keep reading
Batch Edit CAS Display Index w/ S4S v3.2.0.8 (Star) and newer

I was looking around S4S full changelog until my eyes caught something interesting 👀
+ Added a batch edit menu to folders in My CC + Added a batch edit option to set the CAS Display Index of all packages in a folder. 🆕 + Added another batch edit option to My CC Folder menu - "Change Display Index (sorted by package name)"...
Previously, the only way you can group CC creators together is if you edit their CAS display index per packages in S4CASTools. Now, with the new S4S update, you can do so with the batch edit feature in one go!
🆕 With the S4S v3.2.1.3 update, there's now an option to change all CCs in a folder to your assigned display index number, sorted by package name. If you're looking to sort your CCs alphabetically, now you can! More details later.
⚠️ Do note that for every batch fix you do, it will create a backup folder with all the unedited files stored in \Documents\Sims 4 Studio\Batch Fixes, which can bloat your storage quickly. Do your batch fix in small batches, regularly check in-game if it works correctly, and continue. You might need to delete the backup files in the Batch Fixes folder if you’re no longer using the unedited files.
Process below:
01. Have the most recent Sims 4 Studio (Star) installed.
02. Separate files into folders based on creators. Here I have Gorillax3 & clumsyalien's ccs into their own respective folders:

Whatever packages you put in a folder will all obtain the same CAS display index value. So if you want to have specific style of CCs sorted together, put them all in the same folder. It's also recommended that you rename the folders to include the CAS display index value you plan to assign, so that it's easy to do batch edit again when new CCs are added into that folder.
03. Go into My CC, right click a folder, and it will show you the option to batch edit CAS Display Index & another one to sort by package name.


If you choose the first option: all packages in that folder will be assigned the same display index value. Example: packageA to packageD will all be assigned 70 as its CAS display index. If you choose the 2nd option (Sorted by package name): each package will be given the display index value you assigned + decimals so that it will be sorted alphabetically. Example: packageA is assigned with 70 - packageB: 70,001 - packageC: 70,002 - and so on. If you're looking to sort your CCs alphabetically or by release date (e.g. QRsims's / Rusty's CCs), the 2nd option will be best for you :)
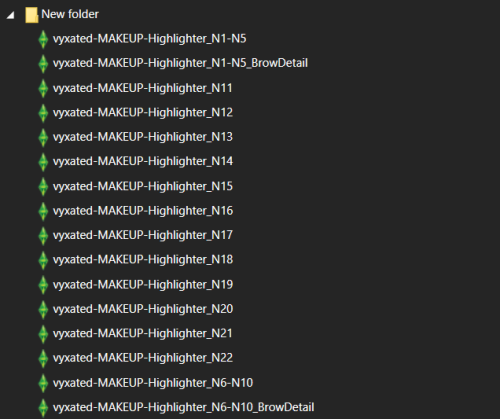
extra info to keep in mind: it seems that if you number your creations, it will be sorted by how they're sorted in the My CC list, and not from the explorer itself. So N6 will be given a higher display index than N21.
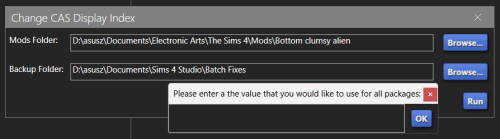
04. Once you've clicked the option, it will ask you which folder you're doing the batch fix on & the backup folder, and ask you what value you'd like for all packages in that folder. I set clumsyalien's folder to 70 and gorillax3's to 75.
There's no restriction on what value you choose. All that matters is that CAS CCs with lower CAS display index value will show up higher in the catalog than CCs with higher CAS display index value.
05. Click OK and it will tell you which files has been edited. Once you've successfully edited your files, you'll get a nicely sorted CAS CCs to browse :) Results are below:

Enjoy and happy sorting! :D
@thefoxburyinstitute
Converting Fem-Frame Mesh to Masc-Frame
This tutorial assumes you have basic knowledge on blender and sims4studio, so i won’t go over basic things. As always, you’ll need to export the mesh you wish to convert first. Next, open it in blender and switch into edit mode.


Hit ‘UV sync selection’ to make the work easier.
Now, with the ‘L’ key, select only the body parts and separate with the ‘P’ key. Your mesh should look like this:


Then, hide the body (hit ‘H’ key or hit the eye icon in the outliner tab) and import the needed male body mesh. If your object is only a top or only a bottom you may not need the whole male mesh, but just to be safe, I prefer importing both regardless for a better view of how the weights look later.
Before editing the mesh, make sure to merge by distance so nothing breaks or gets crunchy in the sculpting step.


The Main Event:
aka sculpting the mesh to the male body. Go into sculpt mode and select ‘elastic deform tool’, either through the button itself or the keys ‘shift+space 8’. Then make sure to select ‘mirror: x’ in the symmetry tab so that everything you do on one side occurs on the other to keep it all even.
If all's well, when you move around the mesh, your cursor should look like this:

You may need to switch between ‘material view’ and ‘solid’ with x-ray on as shown in my recording to get a good look and keep everything proportional.
Before moving onto weights, I usually look back at the original female body to see what parts were deleted as an outline for how I will now delete parts from the male body. Visually, the easiest way for me to do this is I select both bodies, with the female pre-highlighted and the male unselected, and then select parts while holding the shift key.


Separate and hide the other meshes, leaving you with something like this:
If you don't see any holes anywhere, we can now move onto weight painting.
Weights
The first thing you want to do is to look for the cas-breast weights and delete them. Theyre not needed and will only fuck up things later LOL.

Now, go to the ‘spine_1’ weight, it’ll probably look like that, which we dont want. So hit the button ‘weights’ and select ‘normalize all’ as such :


Spine1 should now look like this

After this point, weight painting is very dependent on the mesh itself, so, the most I can say is to un-hide the rig and rotate various bones to ensure the clothes move properly and/or don’t clip anywhere. If it does, those are the weights you'll need to fix.
When youre done, merge both meshes together and import it. Once it's imported, youll wanna export it again to fix the uv_1.
Why? Because we merged vertices earlier and that impacts the way the uv_1 turns out. Seeing lines go across every side of the mesh negatively impacts the way itll morph on the body in-game. Everything has to fit correctly. Example of a not well uv_1:

Once the mesh is re-imported, separate the body from the dress/clothes so the uv_1 editing happens /only/ to the clothes. Add a complete male mesh again, select your outfit and go to modifier properties and select ‘data transfer’. Make yours look like this:

After applying it, it should look something like this:

And now you're free to combine the two meshes and to merge by distance again!!
Finally, import and check how it looks in game. It's usually never perfect the first time…
How did this dress turn out? Well, like I said, its imperfect still but looks like this in-game atm:


(all mascframe-male)
Dear Template/PSD makers, WE LOVE YOU💖
I really think that we, as a community, should take a second and thank everyone who uploads their resources for free for the community to use! Specifically templates and PSDs.
They've BOOMED in popularity lately with the amazing @awkwardwhims' PSD collection and @windslar's PSD collection! These are TRULY such amazing resources. Editing can be extremely daunting, and having templates makes it so much more accessible to everyone. I have really been enjoying seeing everyone's spins on the templates so much! It just makes me so happy to see people sharing free resources with the community. Thank you so much to the talented creators who take the time and effort to put together PSDs and templates for everyone to use.
I also highly recommend you check out @folkbreeze's PSDs, @lysiablr's UI mockups (I personally used these for years before recently switching it up), and the ts4 template tag on tumblr!


10 custom made light leaks in a red/orange palette
Resize, reshape, rotate, and combine them to get any look you want
Use to enhance screenshots for any game, not just the Sims, and even in real life photos, for a vintage film effect!
Download contains 10 individual .psd files as well as instructions on how to use them
Credit to graphicburger for the dust overlays used in my example photos: link
Credit to @simsinlowspace for the simlish font used in the datestamps in my example photos: link
DOWNLOAD (ko-fi, always free)
Files are ALWAYS free but as a disabled low-income Simmer, donations are MUCH appreciated for the time and effort put in to creating these resources 🖤 thank you!