
262 posts
Friday Night Tutorial Time


friday night tutorial time
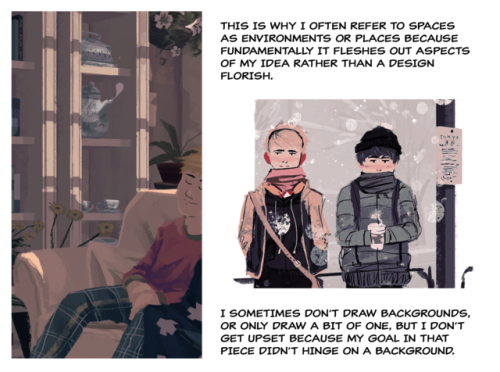
this post is massive but i tried to cover both the conceptual and technical side, hopefully it’s somewhat coherent
continued under cut
Keep reading
-
 aiiimarrr liked this · 1 year ago
 -
 ginderfluid liked this · 1 year ago
 -
 lazyshenanigans reblogged this · 1 year ago
 -
 lazypinecone liked this · 1 year ago
 -
 artking-4 reblogged this · 1 year ago
 -
 quaisant liked this · 1 year ago
 -
 sephussy liked this · 1 year ago
 -
 animeschibia reblogged this · 1 year ago
 -
 scr34mingcritter reblogged this · 1 year ago
 -
 no1sycaterpillar liked this · 1 year ago
 -
 latenightsundayblues liked this · 1 year ago
 -
 gloosth-b liked this · 1 year ago
 -
 ntj2pj reblogged this · 1 year ago
 -
 wolfsskull liked this · 1 year ago
 -
 liches-covered-in-lich liked this · 1 year ago
 -
 damatris liked this · 1 year ago
 -
 arthalo reblogged this · 1 year ago
 -
arthalo reblogged this · 1 year ago
-
 mildly-upset-cat liked this · 1 year ago
 -
 hiimsuperawkwarddontmindme liked this · 1 year ago
 -
 furioushauntedcomputer liked this · 1 year ago
 -
 hariet208 liked this · 1 year ago
 -
 tehmhachi liked this · 1 year ago
 -
 awkwardqueercreature liked this · 1 year ago
 -
 yesdarknightstuff reblogged this · 1 year ago
 -
 notnaii reblogged this · 1 year ago
 -
 rosabell14 liked this · 1 year ago
 -
 asmolfirefly reblogged this · 1 year ago
 -
 tdpgamingnerd97 liked this · 1 year ago
 -
 agenderaki reblogged this · 1 year ago
 -
 nyadoggo liked this · 1 year ago
 -
 big-mossy-house liked this · 1 year ago
 -
 tofucubicles reblogged this · 1 year ago
 -
 anakinskywalkerisfave reblogged this · 1 year ago
 -
 nymbra-tti liked this · 1 year ago
 -
 katiewolfgirl7 liked this · 1 year ago
 -
 superkliqbaybays liked this · 1 year ago
 -
 r3d1ke reblogged this · 1 year ago
 -
 scrapbox-in-the-attic reblogged this · 1 year ago
 -
 lemenge1 liked this · 1 year ago
 -
 fuzzypatrolfancowboy liked this · 1 year ago
 -
 decemberthenemesis liked this · 1 year ago
 -
 toffeesbabbles reblogged this · 1 year ago
 -
 twadi-gurl reblogged this · 1 year ago
 -
 eternalscribbles liked this · 1 year ago
 -
 cydoniartreferences reblogged this · 1 year ago
 -
twadi-gurl reblogged this · 1 year ago
-
 variablecemetery liked this · 1 year ago
More Posts from Chikasartrefblog


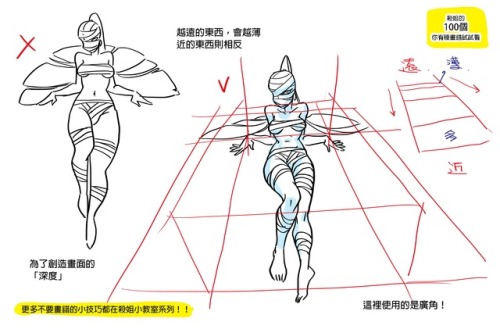
Receding objects in perspective.

Have you ever been trying to draw tiles on a wall or on the floor in perspective, but notice that after you’ve drawn them, they don’t look like they’re all the same shape or size? Well here’s a tutorial on how to fix that. Your picture probably looks like this, right?

Well, i’m here to tell you how to fix that…Let’s start out with your basics.

The gray line is the horizon line, and the black dot is your horizon line. These are essential for the first steps of perspective. Without these, your perspective may turn out wonky and just not flattering to the eyes. Right now we’ll work in One point perspective.

Now let’s pretend we’ll be drawing a hallway. Draw a vertical line where the edge of the wall is.

Now, from the tips of the bottom and top of your wall, you’re going to need to draw a line extending all the way to the vanishing point. If you’re working in photoshop you could either use the line tool, or shift+click. If traditional, you’ll need to use a ruler.

Now that we have the wall that’s in perspective, it’s time to draw the rest of the lines. here I’ve drawn the wall facing us that’s closest, the ceiling, the floor line, and the end of the hallway. ASSUMING that you are working in one point perspective, all vertical lines are straight and parallel to each other, and all horizontal lines are straight and parallel to each other.

Now here I have erased the lines that extended beyond the back wall, and found the center point of the edge of the left wall. From there, you draw an extended line just as before towards your vanishing point.
now make a vertical line where your first “tile” is.


now this may be a little hard to explain. Now you’re going to draw a line coming from the corner of the wall, through the corner where your line meets the tile you just drew, and all the way to the ground line.
You see where these two lines meet? you’re going to draw a vertical line to the ceiling from here.

Like so!

Now rinse and repeat! you should have perfectly even spaced tiles now! And if you have tiles on the ceiling


Just draw horizontal lines connecting to the vertical lines!
Now just erase anyhing you don’t need and…viola! Perfect tiles in perspective!! I hope this helps!! :D
How to show expression with the mouth!
This was a request and at first I wasn’t sure if I had anything to provide with, but as it turn out it got a little longer than I expected because there were actually things I had to say!! Wow!!
Anyway, this is some guidelines I follow when I try to make the face expressfull, more specifically the mouth! It is often neglected, since it’s actually pretty hard, I’ll admit. But I’m here to help (hopefully…)! A mouth expression tutorial as per request. Enjoy and hopefully it will help some a little. ʕ•ᴥ•ʔ
Draw the teeth at the right angle.
This is super important. The upper jaw follows the angle of the head, and the lower jaw will depend on how open it is. Make sure you have a rough estimate of where the teeth are, and how much of them you’re going to see!
The lips will VERY roughly follow the same angle as the teeth. It really depends on the character, but it gives you a sense at least.

If you DON’T do this, you’re going to lose so much volume and the mouth is going to end up looking unrelatable. I showed this example in this tutorial:

It’s not just the lips!
The cheeks, chin, and tongue play a role too!

Try look at your own mouth or references! I have a very pliable and large mouth, so that’s one reason why my characters have it too lmao.
ASYMMETRYYYYY (ง ͠° ͟ل͜ ͡°)ง
I cannot emphasize how important asymmetry is when drawing expressions. It applies not only to the eyebrows to achieve the Dreamwork Face™, but also the mouth. Seriously if you draw a symmetric mouth I will deliver myself to your mailbox and then shout at you until you fix it.
Look at the difference between these two for example: which one has more “life”?

I think you get the idea.
Push and squish - give it flow
Here’s an old drawing I have but it illustrates how I think when I squish the mouth, and use folding and wrinkles to my advantage.

Look at your own face and see where skin bundles up, where it creases the most and when bumps appear on your chin. Subtle details makes all the difference!
One VERY effective detail is illustrated in the first sketch, where I pull upwards on one side, and downwards on the other. That’s a good detail to use when the character is making a skewed expression, or is extremely frustrated. I encourage you to play around with that concept bc it’s ~super effective~!
EXAMPLES:
Happy: Your entire mouth is pushed upwards, not just the corners of your mouth!

I tend to draw a :3 mouth bc I’ve been drawing Lance too much….. You don’t have to but it’s basically imprinted in my motor memory by now.
Pouting/frowning: corners are pushed down, middle pushed slightly up. Sometimes, there’s a slight dip in the middle too. It can give a sense that the character is biting their lips.

Showing frustration/intimidating/is intimidated: basically showing a lot of teeth. The corners are as open as possible and the middle sorta more squished. An extremely important detail here is showing some of the gums, and open space between the cheeks and teeth. That way it looks like the mouth it open to it’s full potential. Here is also where you basically MUST add folds and bumps, or else it’s not going to look relatable.

(Here I am again with the pulling upwards on one side and downwards on the other, as illustrated on the last sketch)
And then again, here’s just another doodle showing how important it is to show the gums. It’s the same face twice, but the second one looks slightly more frustrated doesn’t it?

(from my other tutorial on how to draw facial expressions)
As you can see, this last one is very versatile and I draw it a lot. Play around with the basic shape and see how much subtle details makes a lot of difference!
That’s it!
I hope that cleared some things up and was somewhat helpful! Enjoy drawing ✨


Hello, friends!
Meg here, and welcome back to another round of TUTOR TUESDAY! This weeks topic was recommended by Kisarii, thank you! Today we look at anatomy and some tricks that may make it easier to understand. This is a pretty vast topic so this is just Part One of The Human Body ( aka Gosh Darn Bodies are Da Best and Hands are the Worst ‘n’ We Gon’ Find Out Why)
Have any recommendations for tutorials? Send them on over to either this blog or my personal blog here! Keep practicing, have fun, and I’ll see you next Tuesday!