Exercises. - Tumblr Posts

Tags I have:
‘item’, ‘vehicle’, ‘how to’, ‘resources’, ‘pose refs’, ‘environment’, ‘general’, ‘animation’, ‘creature’, ‘writing’, ‘good noise’, ‘prompts’
There are more tags but these are the main ones, but there are specifying tags which will be added to the tags of this post!
Also: ‘exercises’ is for exercises that are good for artists to prevent/decrease pain
If you want more specific tags, feel free to request them!
And here is a link to Artists for Palestine!

Additionally, I’m going to try to keep one current individual support post up at all times. Here’s the one I have now:
10 outline techniques for writers
With this post I listed 10 outline techniques to help writes move their story from a basic idea to a complete set of arcs, plots, sequences and/or scenes. Or to simply expand whatever you have in hands right now.
If you have a vague story idea or a detailed one, this post is for you to both discover and organize. A few technique will work perfectly. A few won’t. Your mission is to find the one that works best for you. That said, I advice you to try out as many techniques as possible.
So, are you ready? Open your notebook, or your digital document, and let’s start.

1. Snowflake method: Start with a one-sentence description of the novel. Then, develop this simple phrase into a paragraph. Your next step is to write a one-page summary based on the paragraph, you can write about characters, motivations, goals, plots, options, whatever you feel like. From this point on, you can either start your book or expand the one-page summary into four pages. And, at last, four pages into a brief description of known sequences of scenes. Your goal is to make the story more and more complex as you add information, much like a forming snowflake.

2. Chapter by chapter: List ten to twenty chapters, give each chapter a tittle and a brief description of what should happen. Then, break each chapter into three to five basic sequences of scenes. Give each sequence a title, a brief description and a short list of possibilities (possibilities of dialogues, scenarios, outcomes, moods, feelings… just play around with possibilities). From this point on, you can either create the scenes of sequences with a one-sentence description for each or jump straight to writing. Your goal is to shift from the big picture to a detail-oriented point of view.
3. Script: This might sound crazy, but, with this technique, you will write the screenplay of your story as if it’s a movie. No strings attached to creative writing, just plain actions and dialogues with basic information. Writing a script will take time, maybe months, but it will also enlighten your project like no other technique. Your goal is to create a cinematic view of your story. How to write a script here.

4. Free writing: No rules, no format, no step, just grab a pen or prepare your fingers to write down whatever idea that comes up. Think of possibilities, characters, places, quests, journeys, evolutions, symbolisms, fears, good moments, bad moments, clothing, appearances. Complete five to ten pages. Or even more. The more you write, the more you will unravel. You can even doodle, or paste images. Your mission is to explore freely.
5. Tag: This technique is ideal if you have just a vague idea of the story. Start by listing ten to fifteen tags related to the story. Under each tag, create possible plots. And, under each plot, create possible scenes. Grab a red felt pen and circle plots and scenes that sparkle your interest.

6. Eight-point arc: With this technique you will divide your story into eight stages. They are Stasis, Trigger, Quest, Surprise, Critical Choice, Climax, Reversal and Resolution. The Stasis is the every-day-life of your main character. Trigger is an event that will change the every-day-life of your character (for better or for worse). Quest is a period of your main characters trying to find a new balance, a new every-day-life (because we all love a good routine). Surprise will take your character away from their new found every-day-life. Critical Choice is a point of no return, a dilemma, your character will have to make the hardest decision out of two outcomes, both equally important. Climax is the critical choice put to practice. Reversal is the consequence of the climax, or how the characters evolved. Resolution is the return to a new (or old) every-day-life, a (maybe everlasting) balance.
7. Reverse: Write down a description of how your story ends, what happens to your characters and to those around them. Make it as detailed as possible. Then, move up to the climax, write a short scenario for the highest point of your story. From there, build all the way back to the beginning.

8. Zigzag: Draw a zigzag with as many up and downs as you want. Every up represents your main character moving closer to their goal. Every down represents your main character moving further from their goal. Fill in your zigzag with sequences that will take your character closer and farther from the goal.
9. Listing: The focus of this technique is exploring new ideas when your story feels empty, short or stagnated. You’ll, basically make lists. Make a long list of plot ideas. Make another list of places and settings. Make a list of elements. And a list of possible characters. Maybe a list of book titles. Or a list of interesting scenes. A list of bad things that could happen inside this universe. A list of good things. A list of symbolism. A list of visual inspiration. A list of absurd ideas you’ll probably never use. Then, gather all this material and circle the good items. Try to organize them into a timeline.

10. Character-driven: Create a character. Don’t worry about anything else. Just think of a character, their appearance and style. Give them a name. Give them a basic personality. Give them a backstory. Develop their personality based on the backstory. Now, give this character a story that mirrors their backstory (maybe a way to overcome the past, or to grow, or to revenge, or to restore). Based on your character’s personality, come up with a few scenes to drive their story from beginning to end. Now, do the same thing for the antagonist and secondary characters.
So, when is it time to stop outlining and start writing?
This is your call. Some writers need as many details as they can get, some need just an basic plot to use as a North. Just remember, an outline is not a strict format, you can and you will improvise along the way. The most important is being comfortable with your story, exploring new ideas, expanding old concepts and, maybe, changing your mind many times. There’s no right or wrong, just follow your intuition.
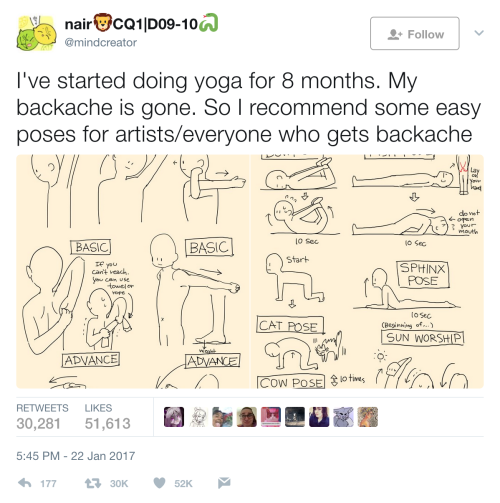
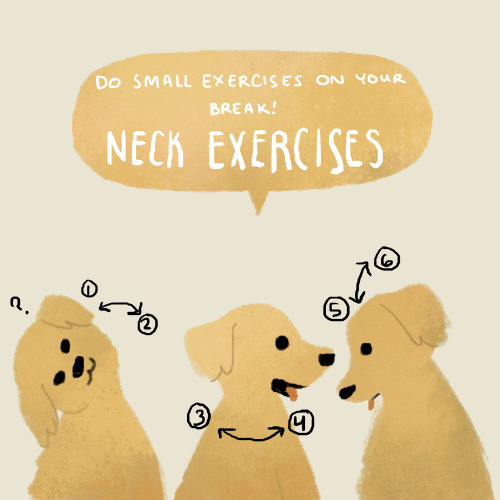
As an artist, do you ever get pain in your hands? If so, do you have any tips on managing it?


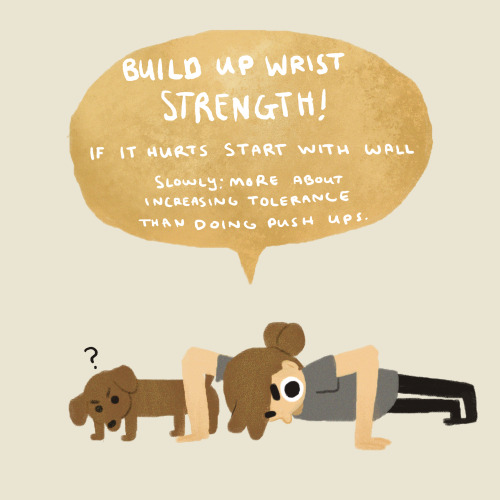
Some eaiser variations of push ups to help you build the strength to do a traditional one!


Hello friends, this is the long awaited tutorial on Line-Quality, Art-Style, and Same-Face-Syndrome.
Line-Quality is improved by building Muscle-Memory.
You build muscle memory through Drawing-Exercises.
Art-Style is developed over time through Observation and Routine.
Routines such as… Drawing-Exercises.
And now for… the Ultimate Drawing-Exercise-Routine!
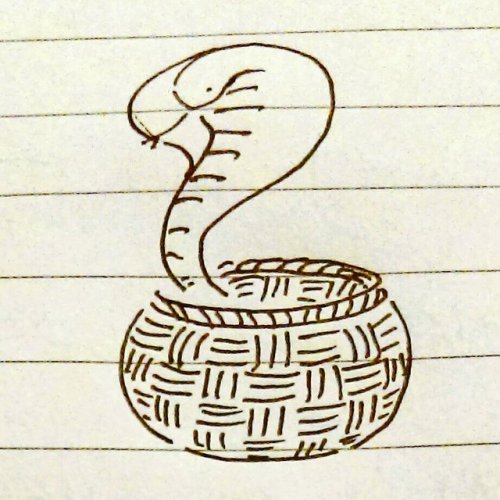
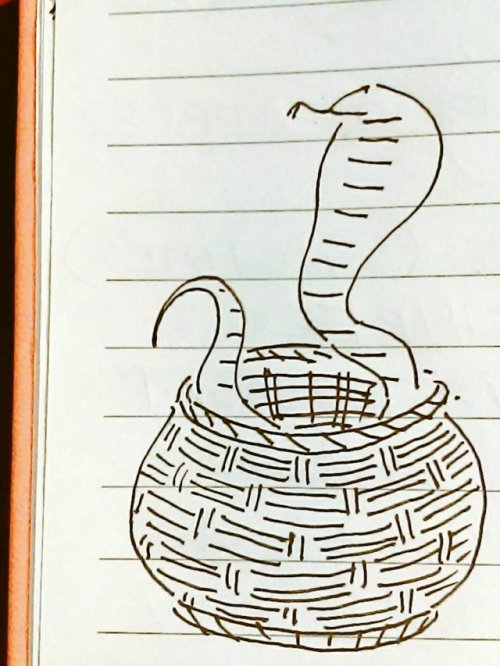
It’s called Snake-In-A-Basket!!
Draw any kind of snake inside of any kind of basket. You have 5 to 20 minutes to complete it before each/every Big-Serious-Illustration to tackle. No more, no less time!
Draw it… NOW!

(my example that I drew in GIMP)
Art-Style is not necessarily what you think it is. A fairly common style issue discussed in artist circles is the inability to draw the same character twice while retaining their likeness or the lack of uniqueness which makes our art (recognizable) distinguishable from another’s “oh! YOU drew this!”.
Here are the fastest pathways to attaining the elusive Art-Style:
Repetition!!!!!
Recurrence-of-Thematic-Elements (everyone is sad, robots, someone is always shirtless, etc)
Same Color-Palette used for everything you draw
Same-Tools (line width, brush set, same paper, canvas size)
or Same-Program
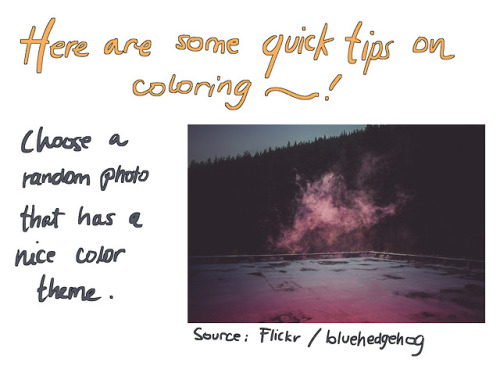
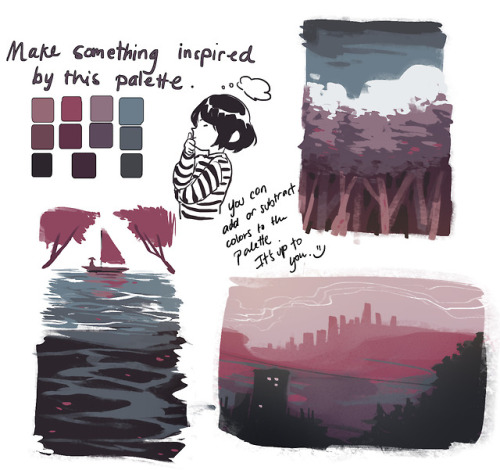
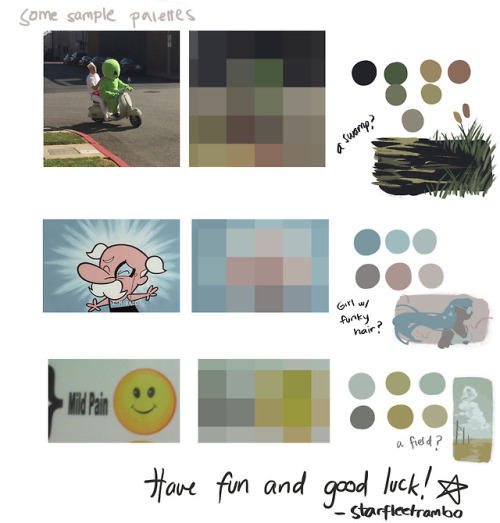
(examples of palettes!! you can’t go wrong with having a rainbow)

Some Amount of Explanation:
If you draw on the same size or same scale (A6, A5, A4, A3 | B6, B5 | Letter) or in the same orientation (Landscape or Portrait), it helps you learn Composition intuitively by training you to make use of the space you have. Also it’s easier to print out and frame if you draw on common photo print sizes 4x6, 8x10, etc.
Even if you make a lot of use of Blend/Blur and you’re more of a Painter than a Cel-Shader– deciding to use a Set Personal-Default-Color-Palette instead of randomly choosing them on the Wheel/Triangle-Thing will still give you enough stable consistency.
Onto the next thing!
Same-Face-Syndrome is normally caused by one of two things. If it’s not one then it’s the other: Same Shapes or Same Details.
To make noticebly different characters you have to Exaggerate.


Circle, Square, Triangle, Rectangle? Short, Wide, Tall, Thin?
Before you try your hand at drawing any Face or Body Type, draw another Snake-In-A-Basket first.

You think I’m joking?
No. I’m not.

So to wrap up, you need to Warm Up to draw, you need to make a color palette and stick to it –or just use the same Crayola pencils, or the same kind of Bic pen, same kind of sharpie, .7 or .5, and have themes like “plaid flannels for everybody” or “hoodies and jeans”. Find those things you can execute consistently, like hatching or stippling, and if you like it, stick with it!
Hope this helps!
Now draw a SNAKE-IN-A-BASKET!


People often say to me: “You draw like some kind of inhuman machine. If I eat your brain, will I gain your power?” The answer is yes, but there is another way. The key to precise drawing is building up muscle memory so that your arm/hand/fingers do the things you want them to do when you want them to do them. Teaching yourself to draw a straight line or to make sweet curves is just a matter of practice and there are some exercises you can do to help improve. If you’re going to be doodling in class or during meetings anyway, why not put that time to good use?


Some eaiser variations of push ups to help you build the strength to do a traditional one!
Tag drop
『tutorials.』 『references.』 『programs.』 『resources.』 『anatomy.』 『clothing.』 『exercises.』 『challenges.』
People often say to me: “You draw like some kind of inhuman machine. If I eat your brain, will I gain your power?” The answer is yes, but there is another way. The key to precise drawing is building up muscle memory so that your arm/hand/fingers do the things you want them to do when you want them to do them. Teaching yourself to draw a straight line or to make sweet curves is just a matter of practice and there are some exercises you can do to help improve. If you’re going to be doodling in class or during meetings anyway, why not put that time to good use?
Precision Excercises
I’d like to tell you a little bit about the warm-up process I do when I’m getting ready to start for the day or settle into a long drawing session. These mini-exercises loosen up my arm and help me identify posture problems and other issues before I start drawing. They work for digital as well as traditional drawing.
Stage 1- Just Scribbles
For a few minutes just doddle fluid loops and curves on your drawing surface. Close your eyes and meditate on what it feels like to be there right that very moment. Feel your pen/pencil on the surface you’re using and think about what makes that medium unique. Get reacquainted with the feeling of drawing without burdening yourself with expectations.

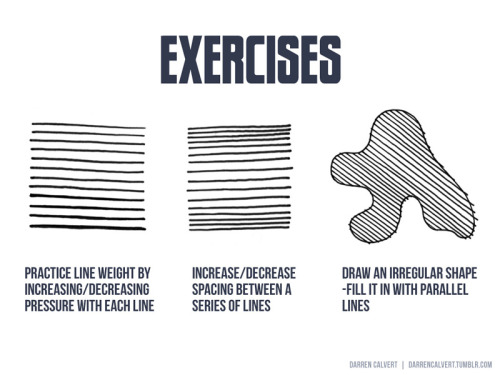
Stage 2- Parallel Lines
In this mini-exercise you’ll draw four sets of parallel lines: vertical, horizontal, diagonal up-left to down-right, diagonal down-left to up-right. It doesn’t matter what order you do them in, but I like to go clockwise in the order that I’ve shown them here, starting with vertical. In each set, draw one series of lines from one direction, then between them draw another from the opposite direction. Do not use the rotation tool for this if you are working digitally, as this defeats the purpose.


Stage 3- Lines & Curves
Start by drawing a constellation of dots or x’s on your drawing surface. For the first part of this stage, connect the marks you’ve made with straight lines. Make them as smooth and even as possible. Don’t feel the need to start and stop your line exactly on the marks. In fact, it’s better to start and stop a bit beyond each mark. Try to strike each mark directly through the middle and focus on minimizing hand shakiness.
For the second part, make another set of marks. Now, instead of connecting two marks with straight lines, connect three marks with a curved line, once again taking care to draw in an unbroken smooth sweep.


Stage 4- Segmented Circles
Sometimes I skip this stage if I’m pressed for time or already feel confident about my precision control for the day. This exercise is a little more free-form than the others. Basically just draw circles as evenly as you can without using a template or digital tools to help, and divide them in various ways with lines and smaller circles. Feel free to throw in other varieties of geometric shapes, ellipses, and whatever else.

People often say to me: “You draw like some kind of inhuman machine. If I eat your brain, will I gain your power?” The answer is yes, but there is another way. The key to precise drawing is building up muscle memory so that your arm/hand/fingers do the things you want them to do when you want them to do them. Teaching yourself to draw a straight line or to make sweet curves is just a matter of practice and there are some exercises you can do to help improve. If you’re going to be doodling in class or during meetings anyway, why not put that time to good use?

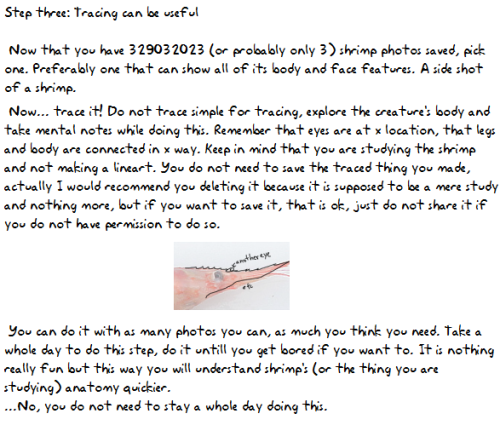
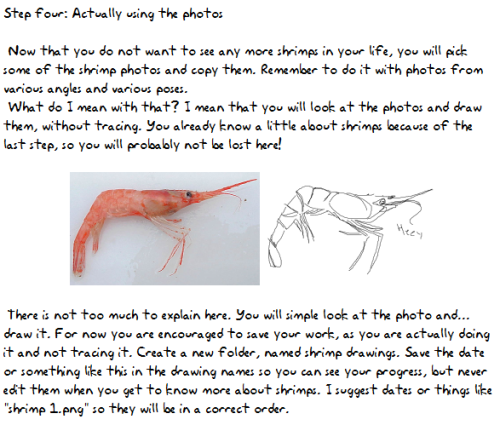

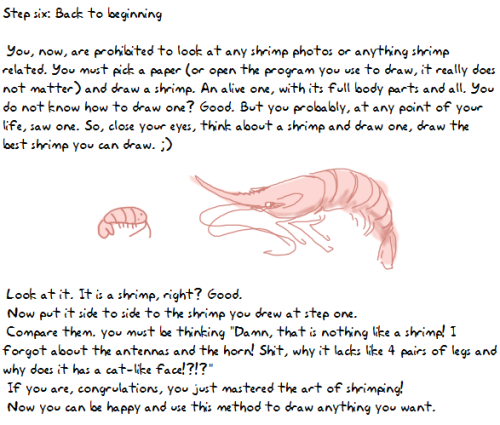
How I pratice drawing things, now in a tutorial form. The shrimp photo I used is here Show me your shrimps if you do this uvu PS: lots of engrish because foreign


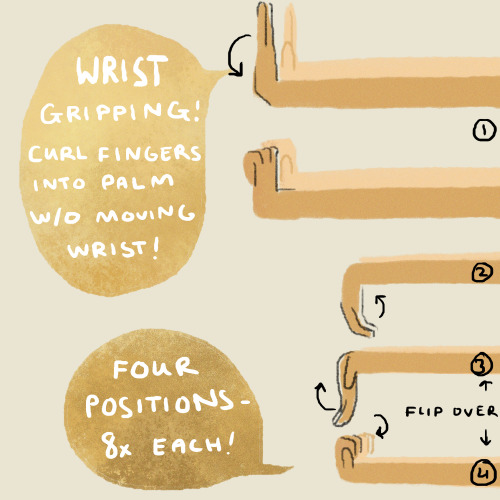

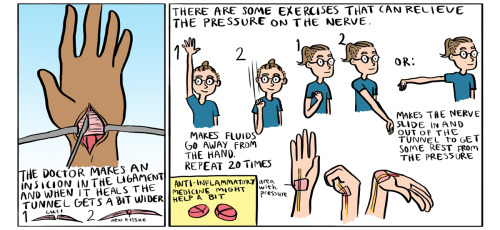
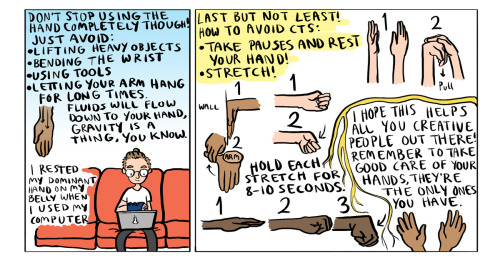
I did some physical therapy for my wrist this year & I haven’t had pain in 3 months now! I thought I’d share some tips I learned.
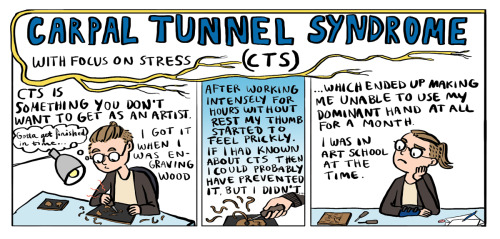
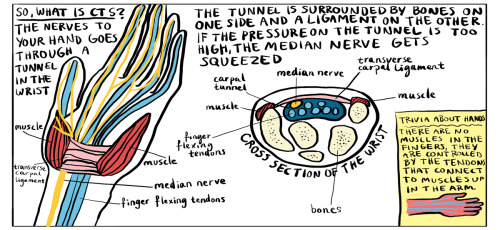
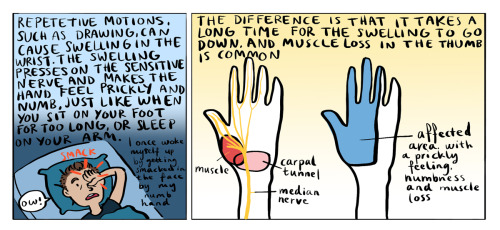
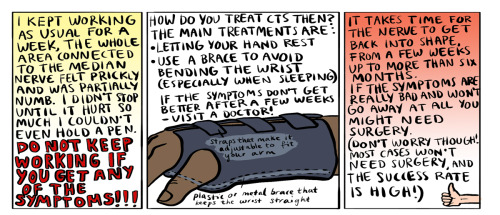
Some information I gathered while having carpal tunnel syndrome myself! I got it almost six months ago and even though it’s mostly gone I can still feel it when I work too hard.
I want to point out that I have NO medical training and that you SHOULD consult a doctor if you suspect that you have CTS. I will however try to do my best to answer questions if anyone has any.
How to make quick sketches from real life models?
The less time you have to draw something, the less detail you can put down.
So, instead you want to put down as much information about the pose as you can with as few lines as possible!
This is called finding the gesture - the essence of the pose. Forget about form, forget about contour, gesture is about the feeling and the motion!
It’s the first stage to any drawing, it helps to have a general idea of what you want to draw down on the page before you jump into the details.
When working from life, the image of what you want to draw is already in front of you. So before you draw anything, take some time to look at what you are going to draw.
Look for the motion, the lines that travel through the body.

Once you’ve found the motion, you can then draw it.

This is the gesture - it does not yet look like a person because there is no form or contour, but it should still give you a sense of the pose and its motion!
You can then build the forms on top of the gesture.

It’s essentially like drawing stick-men, as you’re drawing lines rather than contours.
Those are gestures I spent a couple minutes on to make them look nicer lmao, but this stage is really quick - this one took about thirty seconds


Also a lil tip: When drawing the gesture, you want to use long continuous strokes.
You’re trying to convey as much as you can in one line, because you’re only spending a couple seconds on it! The more you can draw with one stroke, the quicker it’ll be done.

In a life drawing session, you’ll generally be given a minute to two minutes to spend drawing before the model changes pose.
Most of this time you should spend looking for that motion rather than drawing. If you have a minute to draw the pose, spend thirty seconds studying the model!
If you jump right into the drawing, you’ll actually take longer because you don’t know what you’re drawing.
You can practice this at home using pixelovely’s figure drawing tool - set the timer to 1 minute, and try finding the gesture.
If you struggle to finish the pose before the image changes, set it to 2 minutes and spend more time looking at the photo!
If you find it hard to actually find the motion and the gesture in the pose, I recommend practicing on cats instead.

Cats are a lot simpler than humans, and as they’re so flexible the motion is more obvious. They’re a good way to start if you’re having trouble.
And lastly, Proko has a few good videos on gesture and quick poses!